Running AI Models on the Edge with Cloudflare Workers AI
10 min read

By David Muraya • October 9, 2025
Deploying AI models has traditionally been complex and expensive. It often involves managing dedicated GPUs, dealing with infrastructure scaling, and navigating high costs, even when the models are idle. For example, Meta (Facebook) has invested in massive GPU clusters to power advanced AI research and products like Llama and Llama 2. Building and maintaining such infrastructure requires significant capital, ongoing operational costs, and deep engineering expertise. For most companies, scaling AI in this way is out of reach. Even for large enterprises, managing dedicated GPUs, infrastructure scaling, and high costs - especially when hardware sits idle - can be a major barrier to adding AI features to their applications.
Cloudflare Workers AI offers a different approach. It allows you to run a catalog of open-source AI models on Cloudflare's massive global network in a serverless environment. This means you can perform AI inference without managing servers, and you only pay for what you use.
This guide explains what Workers AI is, how it works, and how you can use it to run AI tasks from your own applications.
What is Cloudflare Workers AI?
Workers AI is a platform for running machine learning models on serverless GPUs. Instead of setting up your own infrastructure, you can make API calls to models hosted and optimized by Cloudflare. Because these models run on Cloudflare's edge network, inference happens close to your users, which reduces latency.
Key features include:
- A Catalog of Models: Access to over 50 open-source models for tasks like text generation, image classification, and speech-to-text.
- Serverless GPUs: You don't need to provision or manage any hardware, as announced in their launch press release.
- Pay-as-you-go Pricing: You are billed only for the compute you use, making it affordable to get started.
- Privacy-focused: Cloudflare states that data used for inference is not used to train their models, which helps with compliance and user privacy.
How to Run a Model with Workers AI
You can run a model from anywhere using the Workers AI REST API. All you need is your Cloudflare Account ID and an API Token.
Here is a simple Python example showing how to use the requests library to get a response from Meta's Llama 3.1 model.
First, make sure you have requests installed:
pip install requests
Then, you can run the following script. Remember to replace the placeholder environment variables with your actual Cloudflare credentials.
import requests
import os

# Get your Account ID and API Token from environment variables
ACCOUNT_ID = os.environ.get("CF_ACCOUNT_ID")
API_TOKEN = os.environ.get("CF_API_TOKEN")

# The model and API endpoint
model = "@cf/meta/llama-3.1-8b-instruct"
api_url = f"https://api.cloudflare.com/client/v4/accounts/{ACCOUNT_ID}/ai/run/{model}"

headers = {"Authorization": f"Bearer {API_TOKEN}"}

# The prompt for the model
prompt_data = {
    "prompt": "Where did the phrase Hello World come from"
}

# Make the API request
response = requests.post(api_url, headers=headers, json=prompt_data)

if response.status_code == 200:
    result = response.json()
    # Print the model's response
    print(result.get("result", {}).get("response"))
else:
    print(f"Error: {response.status_code} - {response.text}")
This script sends a prompt to the Llama 3.1 model. The process is straightforward: construct the API URL, set the authorization header, and send your data in a POST request.
The API response will be a JSON object containing the model's output:
{
  "result": {
    "response": "Hello, World first appeared in 1974 at Bell Labs when Brian Kernighan included it in the C programming language example. It became widely used as a basic test program due to simplicity and clarity. It represents an inviting greeting from a program to the world."
  },
  "success": true,
  "errors": [],
  "messages": []
}
Integrating with Cloudflare Workers: A Production Example
The real power of Workers AI comes from using it directly within a Cloudflare Worker. This allows you to build full-stack AI applications that run entirely on the edge.
Let's build a production-ready, private AI gateway. This Worker will:
- Secure an endpoint with HTTP Basic Authentication.
- Allow the client to select the AI model.
- Support both streaming and non-streaming responses.
- Handle tool calls for building more advanced agents.
Here is the complete code for the Worker. We'll break down the key parts below.
// A production-ready Cloudflare Worker for private AI inference

// --- Constants and Helpers (defined once per worker instance) ---

// Timing-safe comparison function to prevent timing attacks
const timingSafeEqual = async (a, b) => {
  const encoder = new TextEncoder();
  const aBytes = encoder.encode(a);
  const bBytes = encoder.encode(b);

  if (aBytes.byteLength !== bBytes.byteLength) {
    return false;
  }
  // This is a Web Crypto API function available in Workers
  return await crypto.subtle.timingSafeEqual(aBytes, bBytes);
};

const jsonError = (message, status = 400, extraHeaders = {}) => {
  const headers = {
    "Content-Type": "application/json",
    ...extraHeaders,
  };
  return new Response(JSON.stringify({ detail: message, status }), {
    status,
    headers,
  });
};

// Simple landing page HTML
const LANDING_HTML = `
<!doctype html>
  <html lang="en">
    <head>
      <meta charset="utf-8" />
      <title>My AI</title>
      <meta name="viewport" content="width=device-width,initial-scale=1" />
    </head>
    <body>
      <h1>My AI</h1>
      <p>This resource exposes a private inference endpoint for My AI.</p>
    </body>
  </html>
`;

// CORS settings
const CORS_ALLOW_ORIGIN = "*";
const CORS_COMMON_HEADERS = {
  "Access-Control-Allow-Origin": CORS_ALLOW_ORIGIN,
  "Access-Control-Allow-Methods": "POST, GET, OPTIONS",
  "Access-Control-Allow-Headers": "Content-Type, Authorization",
};

// Default model if client doesn't provide one
const DEFAULT_MODEL = "@cf/meta/llama-4-scout-17b-16e-instruct";

export default {
  async fetch(request, env) {
    // --- Routing ---
    const url = new URL(request.url);
    const pathname = url.pathname.replace(/\/+$/, "") || "/"; // normalize trailing slash

    // Allow OPTIONS for CORS preflight for any route
    if (request.method === "OPTIONS") {
      return new Response(null, { status: 204, headers: CORS_COMMON_HEADERS });
    }

    // Landing page: public GET
    if (request.method === "GET" && pathname === "/") {
      return new Response(LANDING_HTML, {
        headers: {
          "Content-Type": "text/html; charset=utf-8",
          ...CORS_COMMON_HEADERS,
        },
      });
    }

    // AI endpoint
    if (pathname === "/v1/chat") {
      // Only accept POST here
      if (request.method !== "POST") {
        return jsonError("Method Not Allowed. Use POST for /v1/chat", 405, CORS_COMMON_HEADERS);
      }

      // 1) Basic Auth (only for this route) - Now with timing-safe comparison
      const authHeader = request.headers.get("Authorization");
      if (!authHeader || !authHeader.startsWith("Basic ")) {
        return jsonError("Missing or invalid Authorization header", 401, {
          ...CORS_COMMON_HEADERS,
          "WWW-Authenticate": 'Basic realm="Secure Area"',
        });
      }
      // decode credentials
      try {
        const encodedCredentials = authHeader.split(" ")[1];
        // atob exists in Workers runtime
        const decoded = atob(encodedCredentials);
        const separatorIndex = decoded.indexOf(":");

        if (separatorIndex === -1) {
          throw new Error("Invalid credentials format");
        }

        const username = decoded.slice(0, separatorIndex);
        const password = decoded.slice(separatorIndex + 1);

        const validUser = await timingSafeEqual(username, env.USERNAME);
        const validPass = await timingSafeEqual(password, env.PASSWORD);

        if (!validUser || !validPass) {
          return jsonError("Invalid username or password", 401, {
            ...CORS_COMMON_HEADERS,
            "WWW-Authenticate": 'Basic realm="Secure Area"',
          });
        }
      } catch (e) {
        return jsonError("Invalid Authorization header encoding", 400, CORS_COMMON_HEADERS);
      }

      // 2) Parse JSON body
      let requestBody;
      try {
        requestBody = await request.json();
      } catch (e) {
        return jsonError("Invalid JSON in request body", 400, CORS_COMMON_HEADERS);
      }

      const { messages, tools, stream, model } = requestBody;
      if (!messages || !Array.isArray(messages) || messages.length === 0) {
        return jsonError("Request body must contain a non-empty 'messages' array", 400, CORS_COMMON_HEADERS);
      }

      // Construct AI payload
      const aiPayload = {
        messages,
        stream: stream === true,
      };
      if (Array.isArray(tools) && tools.length > 0) aiPayload.tools = tools;

      const modelToUse = model || DEFAULT_MODEL;

      // Call the AI model
      try {
        const aiResult = await env.AI.run(modelToUse, aiPayload);

        // If client asked for a stream, return the object directly (it may be a ReadableStream)
        if (aiPayload.stream === true) {
          // aiResult may be a stream; return it directly with text/event-stream
          return new Response(aiResult, {
            headers: {
              "Content-Type": "text/event-stream;charset=utf-8",
              "Cache-Control": "no-cache, no-transform",
              ...CORS_COMMON_HEADERS,
            },
          });
        }

        // Non-streaming: aiResult may already be an object or string
        if (typeof aiResult === "string") {
          return new Response(aiResult, {
            headers: {
              "Content-Type": "text/plain;charset=utf-8",
              ...CORS_COMMON_HEADERS,
            },
          });
        } else {
          // JSON response
          return new Response(JSON.stringify(aiResult), {
            headers: {
              "Content-Type": "application/json;charset=utf-8",
              ...CORS_COMMON_HEADERS,
            },
          });
        }
      } catch (err) {
        // Log error server-side if you have a logging solution, and return 500
        return jsonError("AI service error: " + (err?.message ?? "unknown"), 500, CORS_COMMON_HEADERS);
      }
    }

    // Unknown route
    return jsonError("Not Found", 404, {
      ...CORS_COMMON_HEADERS,
      "Content-Type": "application/json",
    });
  },
};
Breaking Down the Worker
-
Basic Authentication: The Worker first checks for an
Authorizationheader. It usesatob()to decode the Base64 credentials and compares them againstUSERNAMEandPASSWORDvalues stored as environment variables in your Worker's settings. ThetimingSafeEqualfunction is used to prevent timing attacks, where an attacker could measure response times to guess credentials. -
Parsing the Request: It expects a JSON body containing a
messagesarray. It also looks for optionalmodel,stream, andtoolsproperties. This allows the client to control the AI interaction dynamically. -
Running the Model: It constructs a payload and calls
env.AI.run(). If the client doesn't specify a model, it defaults to Llama 3.1. It passes thetoolsarray if provided, enabling more complex agent-like behaviors. -
Handling Streaming: A key feature is its ability to handle streaming. If the request includes
stream: true, the Worker returns theaiResultdirectly. Cloudflare automatically handles this as aReadableStream, which you can consume on the client as atext/event-stream. For non-streaming requests, it returns a standard JSON response.
This single Worker script provides a secure and flexible private gateway to Workers AI, demonstrating how to build robust, real-world applications on the platform.
Example Request to the Production Endpoint
To call your /v1/chat endpoint, send a POST request with a JSON body like this:
{
  "model": "@cf/meta/llama-4-scout-17b-16e-instruct",
  "stream": false,
  "messages": [
    {
      "role": "system",
      "content": "You are a friendly and helpful assistant."
    },
    {
      "role": "user",
      "content": "What is the origin of the pascal programming language?"
    }
  ]
}
Include the Authorization header with your Basic Auth credentials that you set up as Secrets above.
A typical response will look like:
{
  "response": "The Pascal programming language was designed and developed by Niklaus Wirth, a Swiss computer scientist, between 1969 and 1970. Wirth was a professor at ETH Zurich (Eidgenössische Technische Hochschule Zürich) in Switzerland at the time.\n\nWirth was inspired by the ALGOL 60 programming language, which was a popular language for scientific computing in the 1960s. He wanted to create a language that was more efficient, easier to use, and more suitable for teaching programming concepts.\n\nThe language was initially called \"Pascal\" in honor of the French mathematician and philosopher Blaise Pascal, who lived in the 17th century and made significant contributions to mathematics, physics, and philosophy.\n\nThe first version of Pascal, called \"Pascal 1,\" was implemented in 1970 on a PDP-10 minicomputer at ETH Zurich. Wirth and his students worked on the language, and by 1971, a more refined version, \"Pascal 2,\" was developed.\n\nPascal quickly gained popularity as a teaching language due to its simplicity, readability, and ease of use. It was also used for developing small applications, such as games and simulations.\n\nOver the years, Pascal evolved, and various dialects and extensions were",
  "tool_calls": [],
  "usage": {
    "prompt_tokens": 35,
    "completion_tokens": 256,
    "total_tokens": 291
  }
}
Deploying the Worker
You can deploy the Worker manually through the Cloudflare dashboard or automate the process using Wrangler, Cloudflare's command-line tool, which is ideal for CI/CD workflows.
Manual Deployment via Dashboard
- Create a Worker: Navigate to the Workers & Pages section in your Cloudflare dashboard and create a new application.
- Add the Code: Copy the JavaScript code above and paste it into the Cloudflare editor (worker.js) for your new Worker.
- Set Environment Variables: Go to the Worker's Settings tab, then select Variables & Secrets. Add two "Secrets" for the Basic Authentication:
USERNAME: Set this to a secure username.PASSWORD: Set this to a strong, secret password.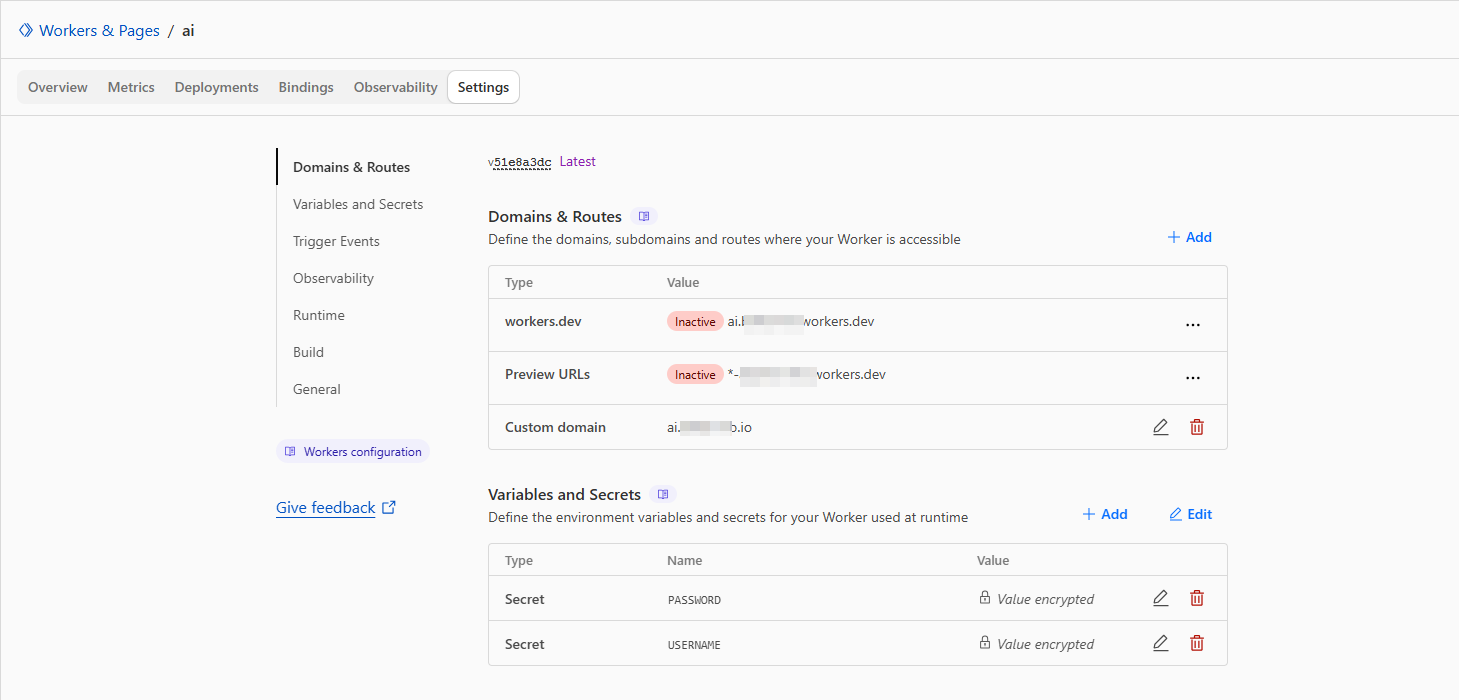
- Deploy: Save and deploy your Worker.
Automated Deployment with Wrangler and CI/CD
For production workflows, you can automate deployments by connecting a GitHub repository to your Cloudflare project. This requires a wrangler.toml configuration file in your repository alongside your worker.js file.
Here is an example wrangler.toml configuration:
# wrangler.toml
name = "ai-gateway" # The name of your Worker application
main = "worker.js"  # The entrypoint for your Worker
compatibility_date = "2025-09-27"

# Bind the AI service to your Worker
[ai]
binding = "AI"

# Enable logs for observability
[observability.logs]
enabled = true

# Configure a custom domain
[[routes]]
pattern = "ai.yourdomain.com"
custom_domain = true
Key Configuration Points:
- CI/CD: By connecting your GitHub repository, Cloudflare can automatically deploy your Worker whenever you push changes to your main branch.
- Custom Domains: Workers support custom domains. After configuring the domain in your Cloudflare DNS settings, you can add a
[[routes]]block to yourwrangler.tomlfile to map the Worker to a specific hostname.
Why Use Workers AI?
The main benefits of using Workers AI are simplicity, cost, speed, and data privacy.
- Simplicity: You can add AI capabilities to an application with a simple API call, avoiding the need for a dedicated machine learning or infrastructure team.
- Cost: The pay-as-you-go model makes it affordable. You are not paying for idle GPUs, which can significantly lower the cost of experimenting with and deploying AI.
- Speed: By running models on Cloudflare's global network, inference is performed physically closer to the end-user, resulting in faster response times.
- Data Privacy: Cloudflare’s privacy-first approach means data sent for inference is not used to train models. This helps organizations meet compliance requirements and ensures user data is protected. See Cloudflare’s data usage policy and privacy policy for details.
It provides a practical way for developers to build and scale AI applications without the traditional overhead.
Frequently Asked Questions
1. What kind of models are available in Workers AI? Cloudflare provides a catalog of popular open-source models for various tasks, including Large Language Models (e.g., Llama 2), text-to-image (e.g., Stable Diffusion), speech-to-text (e.g., Whisper), and image classification (e.g., ResNet).
2. Can I use my own custom models? As of late 2025, Workers AI primarily supports the models available in its catalog. The platform is evolving, so support for custom models may be introduced in the future.
3. How does the pricing work? Workers AI uses a pay-as-you-go pricing model based on the number of "neurons" computed. You can find more details on the Workers AI pricing page. This means you are charged for the actual processing done by the model, not for the time a server is running.
4. Is Workers AI suitable for production applications? Yes. It is designed to scale automatically and is built on Cloudflare's production-grade infrastructure, making it suitable for applications of any size. The integration with other Cloudflare products like AI Gateway and Vectorize also helps in building a complete, production-ready stack.
This format supports model selection, streaming, and tool calls as described above.
About the Author
About the Author
David Muraya is a Solutions Architect specializing in Python, FastAPI, and Cloud Infrastructure. He is passionate about building scalable, production-ready applications and sharing his knowledge with the developer community. You can connect with him on LinkedIn.
Related Blog Posts
Related Blog Posts
Enjoyed this blog post? Check out these related posts!


Cloudflare Turnstile: How to Block Bots Invisibly in 2026
A Complete Guide to Protecting React and API Endpoints with CAPTCHA-Free Invisible Bot Defense
Read More...
Advanced Performance Tuning for FastAPI on Google Cloud Run
From Cold Starts to Concurrency: A Deep Dive into FastAPI Performance on Cloud Run.
Read More...
Secure FastAPI Environment Variables on Cloud Run with Secret Manager
A Step-by-Step Guide to Managing Production Secrets on Google Cloud.
Read More...
Contact Me
Contact Me
Have a project in mind? Send me an email at hello@davidmuraya.com and let's bring your ideas to life. I am always available for exciting discussions.